Farmers Market lovin'

If you were to ask me a year ago what I thought of farmers markets, I would have simply replied "they're cute!"
This thought saddens me because they are such an important part of sustaining our environment and the building of a community. The fact that I wasn't worried about where my food was coming from, what its environmental impact was, and what exactly is sprayed on or in my food is scary to me. Why have we been not taught to ask questions on our social, agricultural, or economic standards? 
In our world, we go to a grocery store and we are automatically closed off from the facts. Were these animals completely tortured their entire lives so we can get a discount on steak and chicken?  Do most of the products in this grocery store come from third world countries where they exploit workers? How many options do we have on cereals, chips, and other foods that have fake ingredients, but claim to be sugar free with no written indication that it causes cancer and other diseases? Welp, as long as there is nice lighting and irrelevant music, we can dismiss these things and purchase which packaging looks aesthetically nice.
Enough with the grocery store talk though, I wrote this post to give my reasons why the farmers market is so damn important and fun, and can be such an integral part of every day happiness.
 

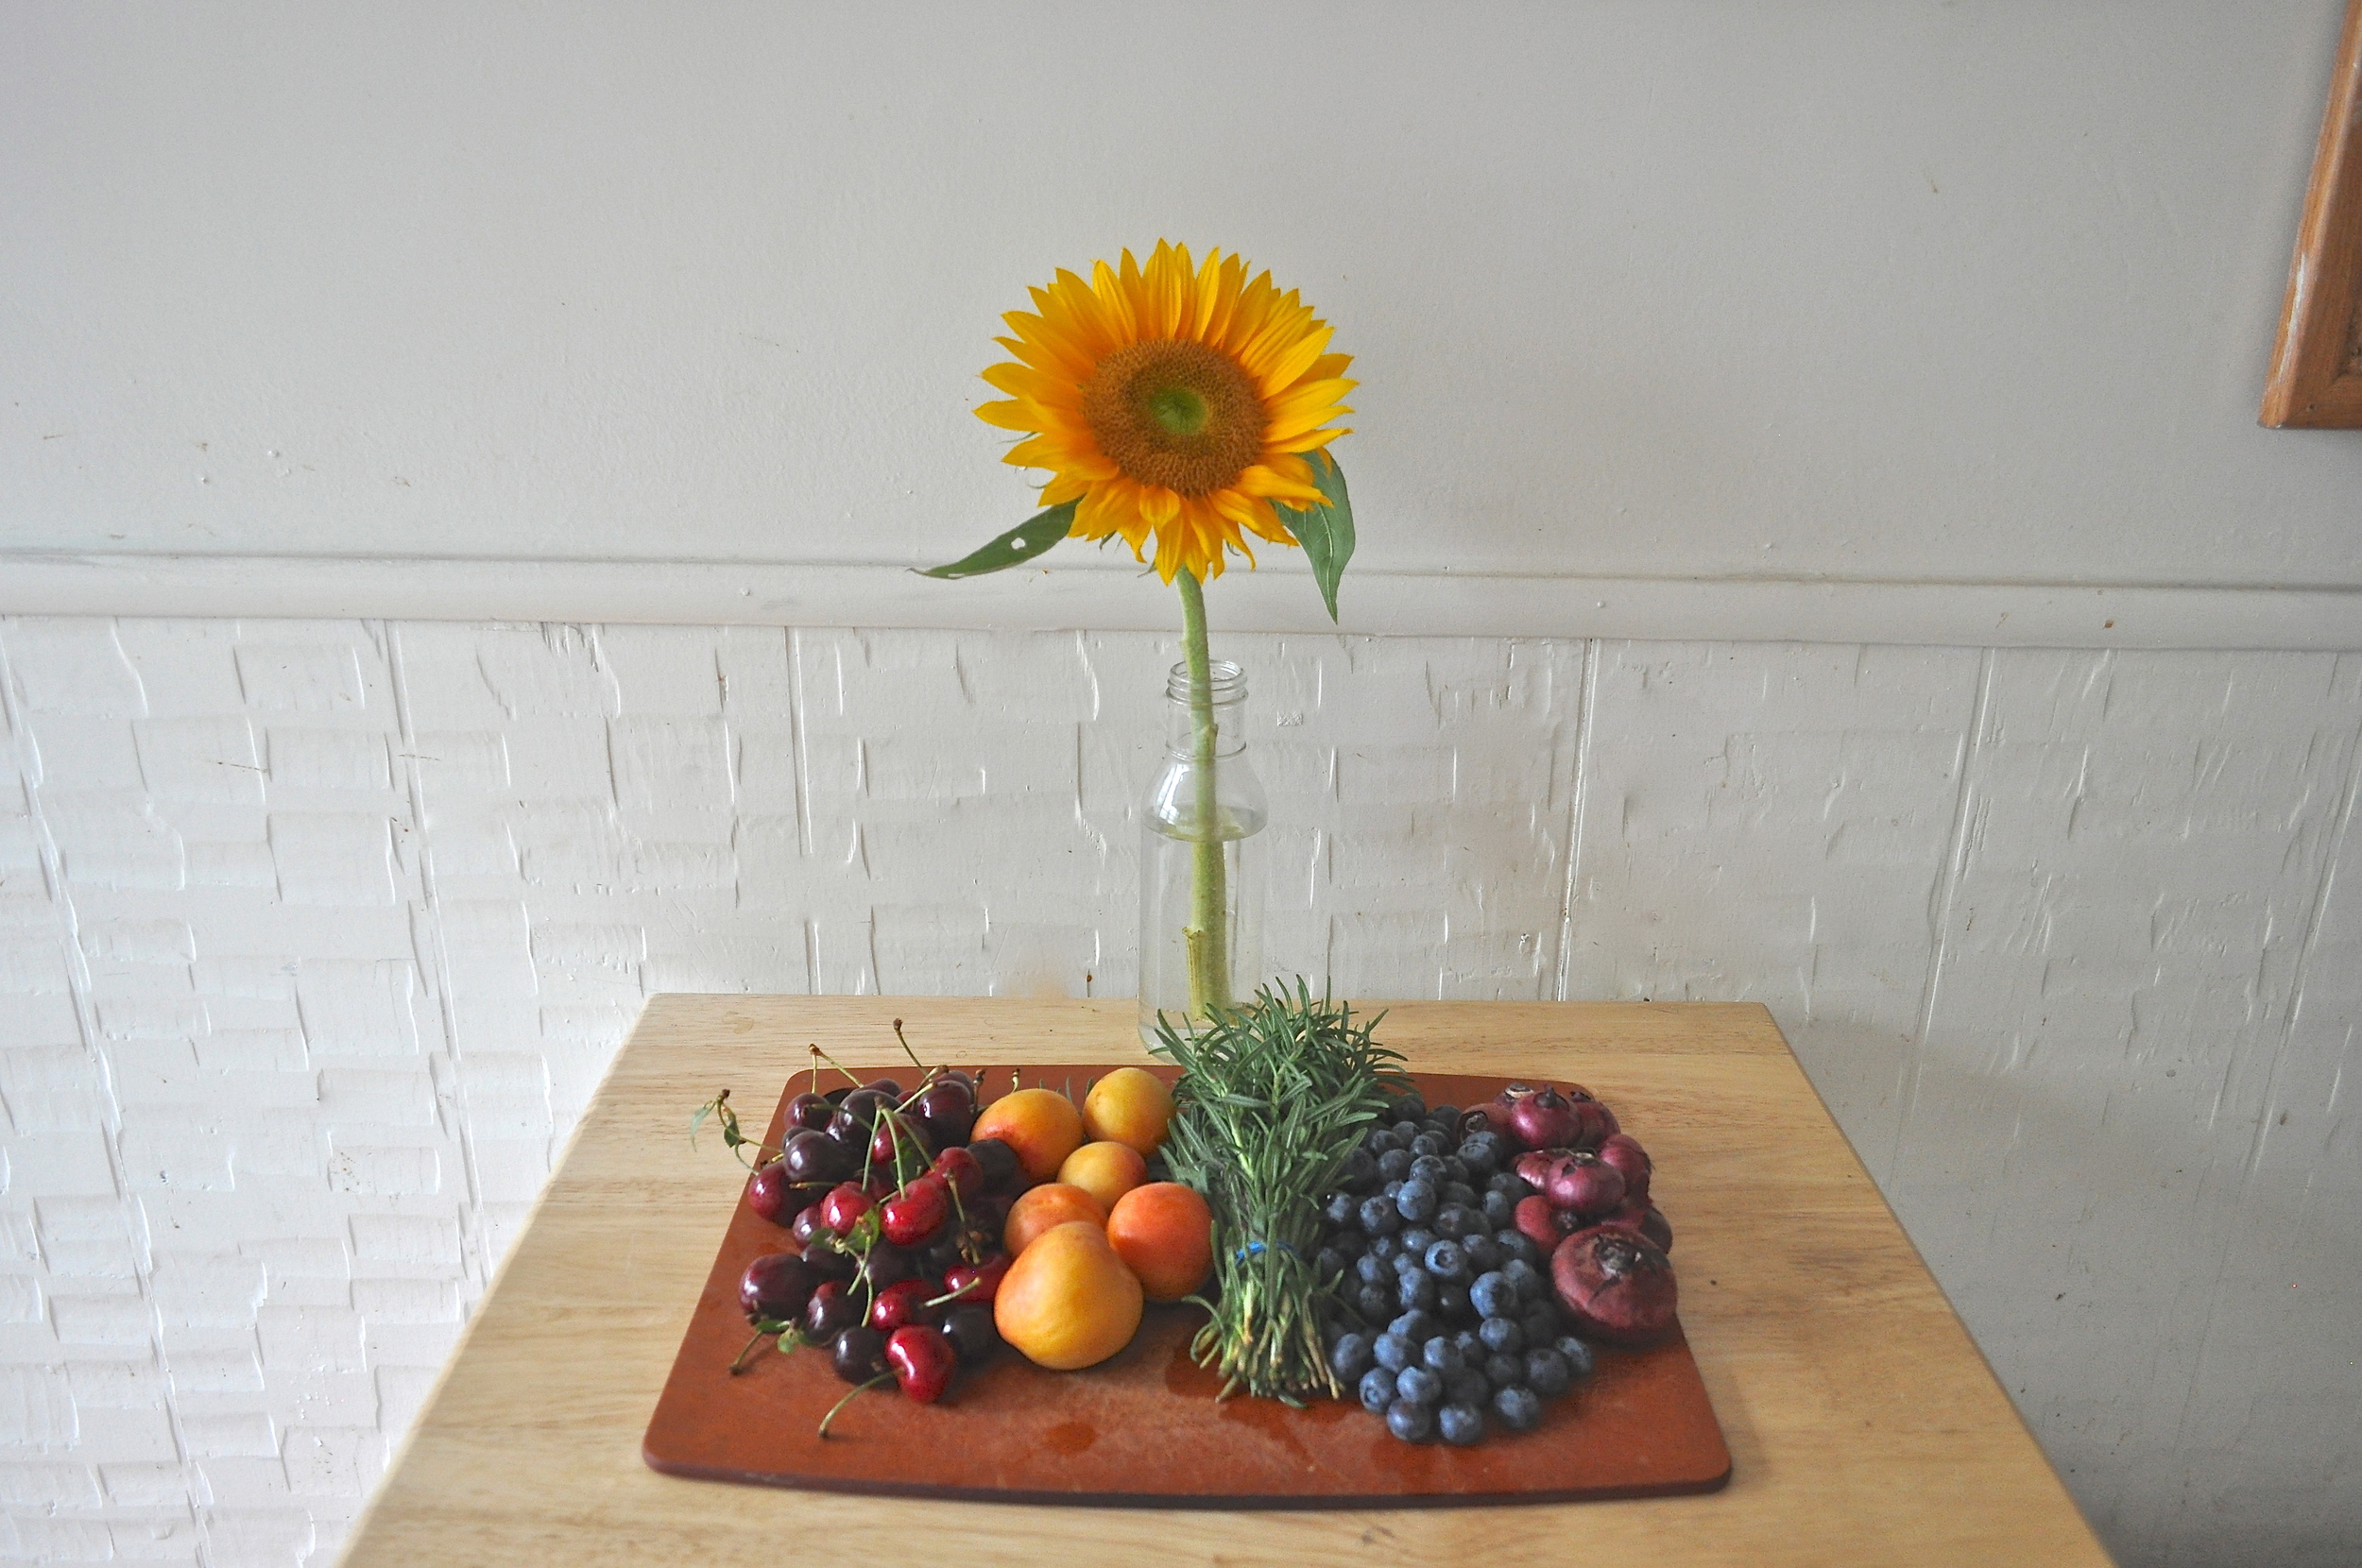
I bring my own cloth produce bags and glass tupperware for zero waste storage! As pictured above! :)

5 REASONS WHY FARMERS MARKETS KICK ASS

1.  Supporting the local farm!  You walk through and see all of these amazing colors and bountiful produce and then directly in the same vicinity, you meet the men or women behind it all.  Nowadays I find it strange and just no fun to have my money and my belly go to large corporations based in other states and countries who don't practice environmental or social justice.  By supporting local farmers you can put a face to the grower, know that there are fewer hands behind the establishment, know they are getting a better return for their goods, and the food is way more delicious. 
2.  Better for the Environment! Without even realizing it, your food travels thousands of miles just to get to your plate. With travel, you're creating way more pollution. Factory corporate farms are also taking over our world and our grocery stores. The scary part is that these businesses are one of the most unsustainable practices of our time, poisoning our earth and their consumers. They are responsible for the destruction and abuse of the land, the animals and of resources. The best way to get your food is local and sustainable. Better for you, better for local farmers, better for the planet.
3. The food is way tastier! Buying for the season is one of my favorite reasons to buy local. Only bringing out the freshest of the seasons bounty, you know exactly what your climate can produce at the time. The flavors and the produce are at its truest peak and were just pulled from the trees and fields the day before. The farmers always love to tell me that their fruit was only picked only 12 hours ago. They urge me to try every type of berry and even urge me to go visit their farm which is only a 2 hour drive to meet everyone. This reason alone can be reason enough for me.
4. Better for you! In most of our grocery stores, they source from factory farms and corporate farms which means a high demand for cheap and convenient foods. This also means these agribusinesses use growth hormones, synthetic fertilizers, poisonous pesticides, and highly processed goods. This denatures all of the nutrients and beauty the food even has to offer. With local farmers, their entire paradigm is producing a item with the best integrity. Their intention is to grow the most wonderful produce possible, to practice sustainability and choose techniques fit for the environment. So not only are you getting natures full nutrients with the goods you buy, but you know that the practice itself is fit for earth.
5. Making friends! When I say making friends, it sounds bit weird. But I really mean forming a community. It is the best feeling to grocery shop outside and stroll through a farmers market feeling the calm, positive and excited energy of the consumers and growers. It makes it something to look forward to instead of something you have to cross of the to-do list. Bring a friend, make a friend, get educated on your food, and enjoy the scene! 

Also to make your farmers market adventure completely zero waste make sure to bring your glass tupperware for meats and cheeses and other berries that might have a stain effect and your cloth produce bags for all your other fruits and veggies!

After you shop for your heart and your tummy, bring it to your home and feel even happier.

DSC_0639.JPG

Gluten free super moist banana bread with home made almond flour

So in my last post I talked about making almond flour from leftover almond pulp. We are now going to put it in use! I am so excited to write this post because the bread turned out SO great! I had reviews from many saying this was the "best and moist one I've made yet." Which I was offended at first because I use to make a banana loaf about once a week, haha. 

Also, this is a zero waste recipe, duh! You can get everything from the bulk section of a grocery store/co-op (bananas, maple syrup, cinnamon, baking soda), the farmers market (eggs, apples), and make it yourself (applesauce, almond milk, almond flour)! Just make sure to bring your own totes, cloth produce bags, and your reusable glass spice bottle. Also remember to compost all your banana peels and food scraps!
 

What I love about this banana bread is its earthy color. The almond flour made it so beautifully brown that it almost looks deceivingly overcooked. But it is so moist, soft, and flavorful. Perfection!
The recipe is as follows:

  • 2-3 bananas
  • 1/2 cup applesauce (you can sub with yogurt or sourcream)
  • 1 tablespoon almond milk (or any other milk)
  • 3 eggs 
  • 1/4 cup maple syrup
  • 1/4 cup coconut sugar
  • 1 teaspoon baking soda
  • 2 1/2 cups homemade almond flour (click here to find out how)
  • 1/4 cup tapioca starch (you can sub this or not use it at all)
  • 1 teaspoon cinnamon

1.  Preheat oven to 350 degrees. Grease a loaf pan of small/medium size with coconut oil or olive oil.
2.  Mix together all dry ingredients : almond flour, baking soda, tapioca starch, cinnamon.
In separate bowl mix all wet ingredients: eggs, applesauce, bananas, maple syrup, coconut sugar, and a dash of almond milk.
3.  Whisk wet ingredients with dry ingredients just until combined. 
4. Put in oven for 35-50 minutes. Check after 30 minutes to see status. It should look nice and brown all around. Poke with fork in the middle and check to see if its still wet. Remember if it is a moist bread you don't want the fork to come out super dry.
5. Eat it, share it, love it!

 I use a fairly smaller in depth loaf pan so my loaves always come out looking long but short in depth. It works as a nice portioned treat for me, especially with butter, fig jam or other preserves. All my friends told me it doesn't need anything though. It was moist and sweetly balanced as is! YAY!


Making Almond flour from leftover almond pulp!

So remember the post I wrote regarding my zero waste home made almond milk? One of the things I wrote about is keeping that almond pulp after you milk it! The picture to the right is the milk and the leftover pulp. Honestly if you were to rewind a few months ago and I did make almond milk, I would have just pitched the pulp because I would have no time or thought to keep it. With my new mindset and constant determination to use everything I own and waste nothing, it brings me so much joy to find different uses for things that seem to be "trash".

Which brings me to this post! We are gonna make almond flour with our pulp! Then in my next post we are gonna make insanely moist banana bread with it! I spent about $15 every week or two on almond flour with plastic packaging that wasn't recyclable. Now I find that this new method is way more cost efficient and SO much tastier! It is only two easy steps! Dry it out (bake it) and pulverize to a powder.

1.  I saved pulp from two batches of almond milk so I had about 2.5 cups worth. In order to dry it out spread it on a baking sheet. For my birthday my best friend, Olivia bought me an entire set of waste free equipment goodies, including a eco friendly baking mat that I am so thankful for. She got it at a local artisanal shop here in Brooklyn but there is a similar one here.  After you spread it out, put it in the oven on the lowest setting. I do 200-250 degrees for about an hour, checking on it and sometimes rotating the pulp every 20-30 minutes. You may have to do it for longer if you do not have all the moisture out.

Before the oven.

After the oven

You can click on the photos to make them bigger but you see the difference in color and texture in each one. The left one is fluffy and moist and the right is crispy and brown. That is what we want - to take ALL the moisture from the pulp.

2. Blend it up! Any machine you have that will make it into a fine powder is great.
 

You did it! Store it in an airtight mason jar or another ecofriendly container. Now prepare yourself for breads, cookies, pancakes and so many other things to fill your sweet soul. 

Smoothie

So my morning smoothie today is a very special one. Every day is a special smoothie day, but this particular day I have a special item that I am very excited about! Fresh and organic coconut meat!

Now I am no smoothie guru. There are many instagram babes that know what's up in the smoothie world, creating artistry with seeds and berries and little things I have never even seen before. My appetite has low patience for making beautiful, intricate things like that on top of my smoothie. I will say though, I can put beautiful things in it! With that being said, I hardly had patience to take this set of photos! I just got out of a 7am spin class that my best friend, Leslie teaches and she is a monster on the bike! Anyhow these things below are what went into todays breakfast.

My smoothies these days normally consist of just frozen bananas, almond milk, and cacao. I'll also put chunks of peanut butter on top or raw granola when I buy it in bulk. The texture when you blend the frozen bananas with little milk is like ice cream.  The consistency is unreal - dense, chocolatey, creamy. Since trash free, I have not been buying chocolate because of the packaging so this always fills that void. Another thing I haven't been able to buy is frozen fruit because of the plastic packaging. However I can now integrate strawberries because they are in season at the farmers market! I got the kale there too.

I got this coconut meat from an amazing woman named Brownie. She is the owner of a beautiful, serene vegetarian cantina called Shanti Shack just a couple blocks away from the East River. There is a mezzanine area on top of her kitchen where there are long couches and bean bags where you can eat, read, or accidentally fall asleep. She is truly an effortlessly kind woman who makes food that hits your heart strings and deep into your soul. Not to mention she composts all her food scraps and she is the most earth responsible owner out there, I'm convinced. All her to-go containers are compostable, biodegradable, and recyclable, too. 

So what is so great about fresh coconut meat? It is a super food fa-sho (for sure). It is packed with minerals, antioxidants, and fiber. Because of the fiber in the fresh coconut meat it functions like a probiotic, which means it feeds the good bacteria in your intestines. Eating this meat consistently regulates the digestive system and is known to aid in weight loss. It has less sugar than other fruits too (not that I ever count fruit sugar as bad sugar).
I'll add a recipe to this smoothie for good measure:

  • 3 frozen bananas
  • 2-4 strawberries
  • 1 cup of kale
  • 1 tablespoon of cacao
  • 3/4 cup fresh coconut meat
  • 1/2 cup of homemade almond milk or less (it seems low but in order to get that ice cream consistency you don't need much milk)


and BLEND! 
Also, do not forget to compost your banana peels and any other scraps you have leftover!

So it's usual even ice creamier than this, but it melted slightly because I had to take the picture and cut the strawberries/bananas to make it kinda pretty! I guess I would recommend cutting them before you blend!

Beach outting!

So this is a quick post just for fun! We went to the beach today!

It was perfect weather and since it was a weekday, there was hardly anyone there! This was the first time since trash free that I went to the beach and I definitely wanted to remember to bring some snacks.
Last summer, we would always go to the bodega by my house before we took off to stock up on things. Water bottles, bananas, chips, trail mix in a plastic tub, tons of granola bars, and all of it in a plastic bag. I'm not going to lie, a lot of times I would eat a bar and just forgetfully leave the scraps in the sand. I knew I left it there, but in my head I would be thinking, "How bad is that really though? It's totally fine there, whatever". Now multiply that by every single person thinking that on the beach. Such a careless thought.
So now here is my new little to go snack kit for today!

My big mason jar of water, an apple I got at the farmers market, and bulk raw organic sicilian almonds. This was easy to carry in my backpack. There is also just something special about carrying it in these cloth bags. That sounds crazy but I feel light and really warm in my heart. Haha, yes, warm in my heart!

So another topic for this post is bathing suites! I used to buy SO many a year (3 or 4). Really cheap ones. Just so I can have new things every time. I do not find anything wrong with having a few set bathing suites, but think of where they are coming from, how they are manufactured, and what mark it is making on the earth to produce them.

This year my best friend Leslie and I decided to go vintage! We bought some really sweet 80's swim suits. I had bottoms from last year that I decided to wear, but the top is from a sweet vintage shop I follow on instagram. They sent it to me in very minimal, and recyclable packaging! I was hesitant to get it wet because sometimes swim suits stretch because of the cheap material, but Leslie and I were both happy with how well they were made! I am never disappointed with the quality of second hand goods.

Simple and creamy homemade almond milk

So when I decided to go trash free, there was a lot of built up excitement. Excited thinking about everything I could replace, followed by a slight doomed feeling thinking of the things I just couldn't do without and no hope of replacing. Then when I managed these feelings and ideas, I realized not only can I replace the impossible things, but probably make them way better. With that being said, I set out to find an alternative to store bought almond milk. I use almond milk every morning for my smoothie ritual so this was important to me. 

The first thing to do is make sure you buy almonds in bulk!  Better yet, bring your own cloth bag, that you can get here! These bags come in many different sizes so all your bulk shopping dreams can come true. I buy raw organic almonds. Why? Because organic means not used with pesticides/herbicides. Almonds easily absorb these chemicals because of their high oil content. When I buy, I also make sure to buy about two pounds worth just so you aren't taking multiple shopping trips for it. This amount lasts me about a month!

I searched high and low for recipes and the foundation of all of them are the same, but you can just tweak a few things based on preference. I personally wanted thick almond milk and I found an amazing recipe which I changed a bit to my preference. You can find it here!  Below is my version of simple and creamy almond milk. Lets get started!

                  Kitchen tools:

Blender/vitamix/food processor (any of these work)
A small/medium sized pot
Cheese cloth (what I use) or nut bag straine

                 Ingredients:

  • 1.5 cups of almonds    
  • 5-6 cups of water  
  • dash of salt                                                     
  • vanilla  
                                                              
    Now for the preferences:
     
  • 1/4 cup coconut sugar (to taste)
                    or
  • 1/4 cup maple syrup (to taste)
                    or
  • 4-6 dates (soak first)


                                                         OKAY! Wooo hoo you are ready!
     

1.  Put 1.5 cups of almonds in a container and completely immerse in water. Let sit for 8-12 hours. You can do a bit less (no less than 6). The longer you leave it, the stronger the almond flavor.
The photo shows the jar I used to submerse and the container I will use to keep in the fridge! 

2. After you have waited the allotted time, its time to whip out all your goods!
All my jars are unlabeled because they are rotating jars, meaning I will use them constantly for different bulk things. Starting from left I have coconut sugar, vanilla, salt, and maple syrup, and in the front I have my cheese cloth.

3. Strain and rinse the almonds well. Throw almonds with your dash of salt and 5-6 cups of water in the food processor or any blender you have for a few minutes. Let them blend until you see some nice froth. After its blended up, you now leave it and let it steep (about 10 minutes)! This is an important part because this is where your flavor will become stronger. I stir it mid-steep with a wooden spoon.


4. While you are letting that steep you can set up your jar! You can use a bowl too. Whatever is easiest to strain. At the bottom of my jar I put in the vanilla, 1/4 cup coconut sugar and dash of maple syrup.
Then pour a little at a time making sure it won't overflow. You'll have to squeeze strain the pulp with your hands every so often making sure all of the milk is out of the cheese cloth. I'll remove some almond pulp out of the cheese cloth every now and then so it doesn't get backed up. Save the almond pulp in another jar for later use (pancakes, almond flour, breads etc…)!!

DSC_0706.JPG

5. By now you should have a separate jar with the almond pulp and your jar of fresh almond milk! Make sure you stir in the sugar.  


Now if you want it thick listen up! 


6. Pour half of the milk into a small sauce pan and put on medium high. Monitor it carefully because right when it starts to form small bubbles along the sides of the pan (almost boiling) then its done. The point is to thicken it up just right, so don't let it start to really boil. When its forming small bubbles, take it off immediately and pour it back in with the other half of the milk! Let it sit out until room temperature.

You did it!!!! Enjoy!!

Pack it light

So to kick off my first blog post, I will start off by saying I wanted to do this blog in the first place because I was getting so many questions! Questions like, "how are you going to do (said thing) trash free?" or "don't you think it's a bit extreme?", or "isn't it way harder to be trash free?". So I decided to just show you what I do know, and hopefully some people can help me answer things I don't know or am struggling with! I love all these questions because that is what we all should be asking ourselves and then challenging them. I have discovered life to be way more purposeful, fun and creative by not wasting. Just think everything you own, consume, and purchase will be utilized! Not one thing will make a harsh mark on our earth. It is so conscious and so powerful.

This post is a little look inside a daily activity of mine - a mini morning adventure to a coffee shop in Red Hook, followed by a small sweet treat picnic by the water! The first photo is just to show how good looking these sustainable to-go cups are. I have one stainless steel mug for hot drinks, and a mason jar with my ecofriendly top, and stainless steel straw for iced drinks!


 My best friend (and room mate) and I always day dream of having discovery days. We usually have 6 am coffee pow wows in our living room so its hard to get us out of that cozy pattern, but once every week or two we try to deviate from our busy afternoon schedules and explore together!  Here is a picture of Olivia! She hates when I take pictures of her, but I make her do it anyway. :D 

The night before, I got apples and rhubarb from the farmers market and made apple rhubarb compote! I also made banana pumpkin corn muffins because I am currently in the "phasing out" stage of being trash free. Meaning everything I used to own (baking flours, sugars, etc…) are being used up until completely gone. I had pumpkin puree, teff flour and corn meal left over so I needed to whip something up!

All the containers in this photo are glass and are either jam jars I had saved, or glass yogurt jars I kept as well. The bag to the right I found in the house which I now use as my to go kit. In this kit, I store: 

  • a cloth napkin
  •  my coffee bell jar (either hot or cold)
  • a stainless steel straw
  • silverware 
  • cloth produce bags
  • small stainless steel bowl or tupperware (sometimes optional but in case of to go salads/rice bowls. etc…)

 
With that being said, it sounds like a lot to cram! But its so light and so easy to carry. You can stick this kind of kit in your back pack, purse, or cloth tote. I have it at all times just in case I find a cute coffee place, or if I go on a flash grocery shopping spree.

The photo on the bottom is to show you the tote I carry for the day!  I had all of this in there, and it was lightweight, and I still had tons of room. I also try to keep my clothing purchases sustainable by shopping for already used items. I find that thrift store purchases are better quality and better fitting anyway! 

If you are interested in the trash free route, or even if you want to start being a little more environmentally conscious I will attach the links to where I got all of these things!!
Thanks so much for reading!! 

http://www.ecojarz.com
http://www.simpleecology.com
http://www.lifewithoutplastic.com/store/